Want to learn more about back strengthening yoga?
Having a strong back is important. Not only is it essential for day to day comfort but having a strong and flexible back helps maintain good health.
Even if you are not currently experiencing back pain, there are so many ways that it can develop due to bad habits. You may have a job where you are hunched over a computer screen all day, not realizing that your poor posture can have an adverse effect on your back in the future.
So, what’s the best way to build a strong back? By doing yoga, of course! With simple at-home yoga practice, you can be on your way to reducing or preventing back pain altogether. And if you don’t, these asanas help build your back up so back stress will hopefully never be a problem.
Contents
- 1 How Does Yoga Help Strengthen My Back?
- 2 Back Strengthening Yoga Can Relieve Back Pain and Reduce Stress
- 3 Back Strengthening Yoga: A 4-Step Yoga Practice to Building a Strong Back
- 4 Step 1: Half Standing Forward Fold
- 5 Step 2: Thread the Needle Pose
- 6 Step 3: Child’s Pose
- 7 Step 4: Corpse Pose
- 8 Back Strengthening Yoga: The Facts
How Does Yoga Help Strengthen My Back?
Before taking a look at asanas, let’s get into how yoga actually strengthens your back. Even though they may seem like it, these poses are not magic. They have real benefits for your body.
There’s a reason why you’re told to hold yoga positions when it comes to your practice. When you hold your asanas, it helps increase strength in particular muscle groups. When it comes to your back specifically, yoga helps to strengthen your spine as well as all of the little muscles around your spine, protecting it from injury as well.
Back muscles aren’t the only muscle group responsible for the overall strength of your back – abdominal muscles are as well. If you make a conscious effort to sit up perfectly straight for a prolonged period, you may notice that you experience soreness in both your back muscles and abdominals.
Your abs are hugely responsible for maintaining proper posture and movement. Therefore, if both your back muscles and abdominals are conditioned, you reduce your risk of developing back pain and begin to ease any back pain that you may already be experiencing.
Back Strengthening Yoga Can Relieve Back Pain and Reduce Stress
If you do already experience back pain, yoga can help reduce stress by stretching, thereby promoting relaxation in muscles that are carrying stress. When you hold a yoga pose, you allow some of your muscles to stretch and others to flex, relieving stress and tension.
With the reduction of stress comes reduced inflammation. The increase of blood flood also promotes nutrients to flow through the body. For those with pain in their lower back, asanas that stretch the hamstrings are helpful as stretching the hamstrings expands motion in the pelvis. By increasing motion in the pelvis, you can then decrease stress along the lower back and, in turn, reduce lower back pain.
Back Strengthening Yoga: A 4-Step Yoga Practice to Building a Strong Back
It’s important to remember that you need to stick to your workout plan. Whether you choose to use ours or some variation of it, be sure to stay consistent. Although you may find some relief by participating in a one-time practice, building strength and flexibility in any muscle group takes time.
We’re now going to take you through a four-step yoga practice of back strengthening yoga, aimed at building a stronger, more flexible back. Keep in mind that at no time should these exercises actually hurt. If you find that they are starting to hurt, there are modifications that can be done for each pose.
Pain or discomfort is often caused by weak hips and hamstrings. Practicing both the Mountain Pose and the Triangle Pose is beneficial for strengthening both of these areas so you can focus on building strength in your back without experiencing any pain.
Step 1: Half Standing Forward Fold
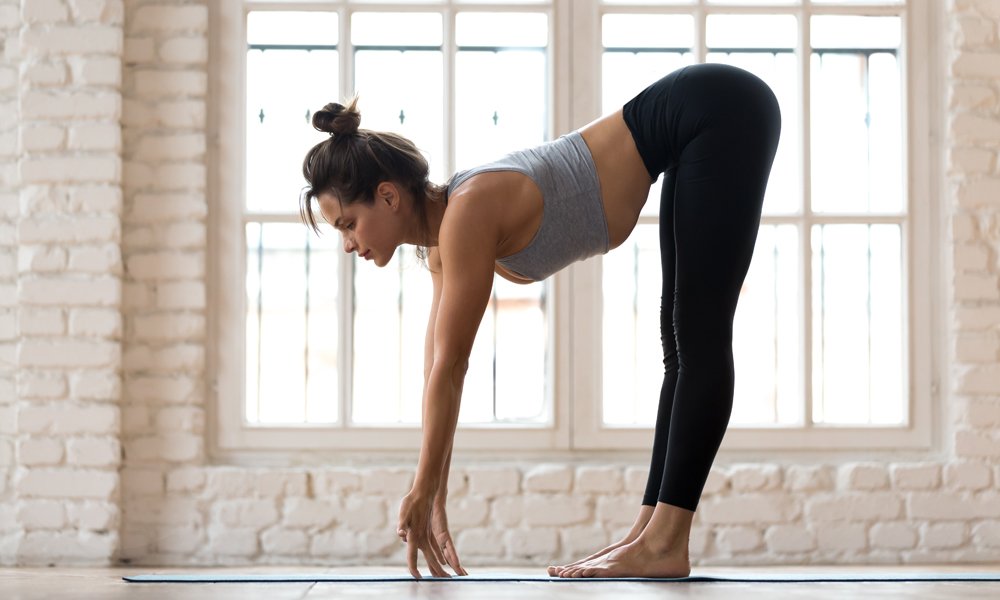
This yoga asana strengthens the back, spine, and abdominal muscles as well as stretching and lengthening the calves and hamstrings. This pose helps improve your posture and relieves tension in your neck and back.
How to:
- Stand up straight on your yoga mat with your feet slightly spread apart and your hands on your hips.
- Inhale and fold forward, arching your back.
- Stretch your fingertips down and place them on the floor.
- Move your hands onto your shins and lift your body halfway up.
- Hold for 10 to 60 seconds and exhale as you straighten your body back upright.
Step 2: Thread the Needle Pose
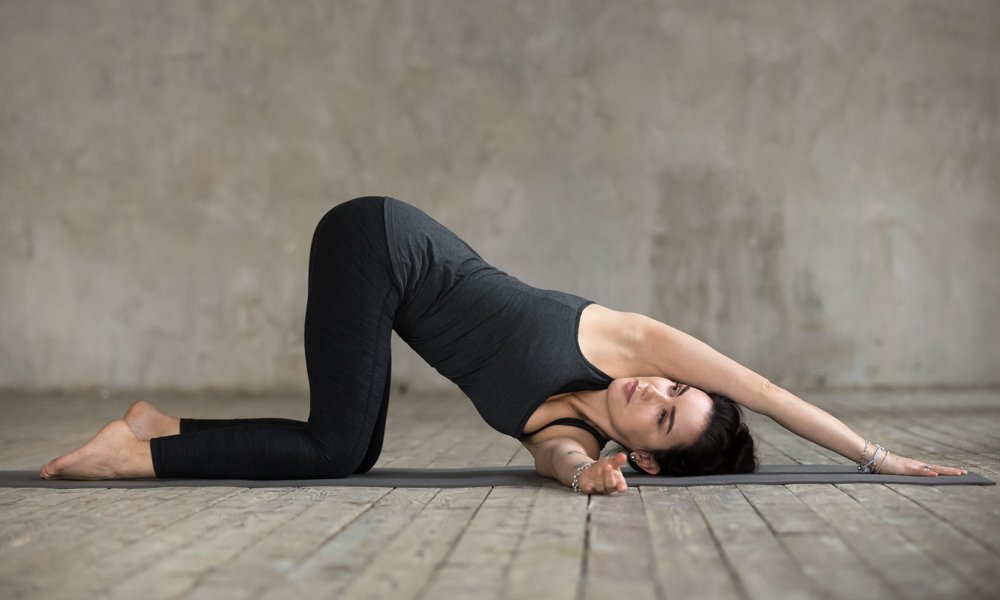
Thread the Needle Pose is fantastic for relieving tension in the upper and lower back as well as the shoulder blades. It stretches the upper back, arms, chest, and neck and gives a mild twist to the spine, helping to relieve tension in the lower back. This asana also relieves tension that comes along with chronic shoulder pain.
How to:
- Begin by lying on your back, keeping your feet and shoulders touching the floor, while bringing the knees up.
- Rest your right foot on your left thigh and reach your hand through the gap between your legs. It should look triangular.
- Reach your left hand around your left thigh, meeting your right hand. Clasp your fingers together and use them to pull your knees into your chest.
- Make sure you’re in a comfortable position and that you’re not pulling too hard or straining your muscles.
- Hold this asana for a few deep breathes before slowly switching positions and repeating with your other leg.
Step 3: Child’s Pose
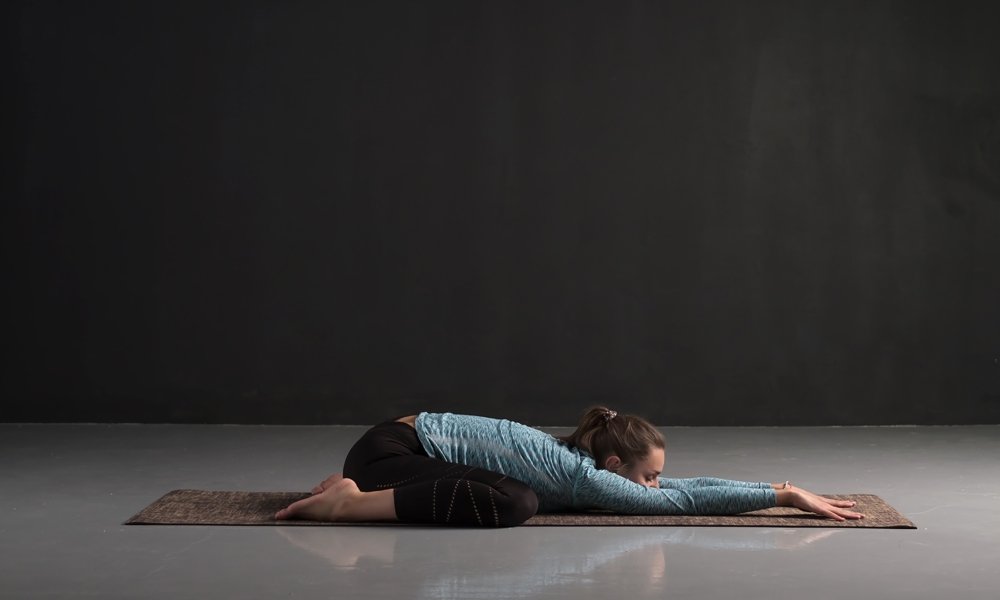
Child’s Pose is the last of our back strengthening yoga poses. It helps to stretch and relieve tension in the lower back while relaxing the muscles on the reverse side of the body. It also promotes flexibility and encourages circulation to the joints, muscles, and discs in the back. Not only does Child’s Pose benefit your back but it is known for being an extremely relaxing pose that calms and soothes the brain.
How to:
- Begin this asana by kneeling on the floor, your knees hip-width apart and your toes together.
- Breathe in and lower your torso between your knees, extending your arms forward with your palms down.
- Exhale and relax your shoulders, allowing them to naturally pull towards the ground.
- Stay in this position for as long as you would like, ideally for a minimum of 30 seconds.
Step 4: Corpse Pose
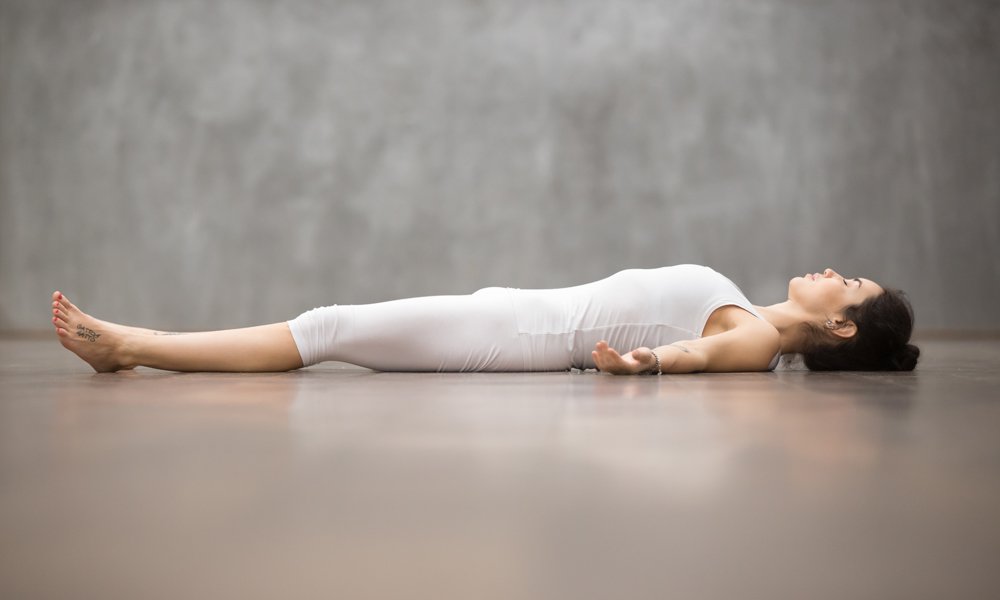
Corpse Pose is an ideal way to end any yoga practice but it is also great for your back. It focuses on the relaxation of both body and mind, releasing tension in your body – including your back. Corpse Pose has many additional benefits for the body, including improving blood circulation, lowering blood pressure, improving concentration, and curing insomnia.
How to:
- Lie flat on your back with your legs straight, letting your arms fall naturally at your sides, palms up.
- Let your feet become heavy and naturally drop open.
- Close your eyes and breathe normally, allowing your body to completely relax and sink into your mat, from your head to your toes.
- Focus on complete relaxation and filling your mind and body with light, peace, and silence.
- Hold this pose for as long as you would like but the general rule is to give yourself five minutes of Corpse Pose for every 30 minutes of yoga practiced.
Back Strengthening Yoga: The Facts
It is a fact that practicing yoga does improve muscle strength – and by participating in our at-home yoga practice, you will build a stronger back over time. While some of these poses may provide immediate relief of back pain, it takes patience, time, and dedication to truly build up that back strength. But trust us when we say it’s worth it!